Tuesday, June 28, 2011

Screencasting 101 + Tips for recording internal audio

@seani Look what I made using Incredibox.  Then I recorded in... on Twitpic
Incredibox


I've been doing screencasts for some time now, for my Photoshop and other technical tutorials, but what I didn't know how to do before, was to record the internal audio.  
I am not yet an expert, but I think I've got it.  (Thanks to my friends on Twitter for helping to answer this one!) To explain more about what screencasting is, and with internal audio, it's when you want to take a video of your computer screen, but also make sure to record the audio that is coming from inside of the computer, and not the noise or talking that is happening in the room just outside of it.   To get best results on internal audio, you do not want to be recording the audio coming out of the speakers on your computer, and then going back into your computer's microphone.  It just won't sound very good.  This is only a good option for voice overs on your screencasts.
First you will need some screencasting software:  This allows you to take a video of your computer screen.  For best results, and highest quality, use the paid software options, but there are also free alternatives.  Adobe Captivate is the industry standard on this one. The screencasting tool inside of Quicktime on a Mac allows you to record video or audio (or webcam) and is also nice for doing quick and easy screencasts that you can edit later in your favorite video editing software.  However, I did not have luck recording internal audio on this one.  I'm not sure why not, but maybe I was doing something wrong.  For free alternatives, try Jing (which you must download) or Screenr, a free online tool that limits you to 5 minute screencasts.  
Next, there is a good chance you will need Soundflower. This was what did the trick for me, as it allows you to pass the internal audio to the other application.  The good news is, you can download it for free.  

Then, before you record your screencast of your Skype video conference, go to system preferences on your computer and change the audio input to "Line-in"  (Make sure to change back later.)

I had success doing this with Camtasia for Mac.  I haven't tried any others, but would be curious to know if they would work too.
So why would someone want to do this?  Well, maybe you would want to record a video conference you had with someone over Skype.  Or maybe you want to capture music that is playing on your computer. Here's a screencast I made for just that purpose.  I made it with Incredibox,  which is a free online music making tool that would not let me download afterward.  Originally I wanted to do this so I could record and save music on the Google's Les Paul Guitar.  (So this is great for musicians!)  Too bad I am not so good at music.  I guess that's next on my list of things to learn..

Monday, June 13, 2011

Phone to cloud with Picasa Web Albums

My search for a perfect solution to transporting and backing up my smart phone pictures to the cloud has continued.  Finally I think I found my favorite way to do this, and this works for anyone with a phone that takes pictures.  (See my previous posts for more information about sending to Flickr or other free photo storage sites.)  But what I really wanted to do was to send my iPhone pics. to a Picasa Web Album.  All you need is a free gmail account to get set up with your free Picasa Web Albums.  There is nothing to download to your smart phone or computer, and I love Picasa Web Albums because you have much more control over privacy settings.  You can mark your photos private, public, or "unlisted" which means that only those who you share the link with can see them.  I also like Picasa Web Albums because they work so well with other free tools by Google such as Blogger, Google Sites, Google Maps, Picnik and more.

To do this, first log into Gmail.  Look for the "Photos" button on the top of the menu bar, and click on it.


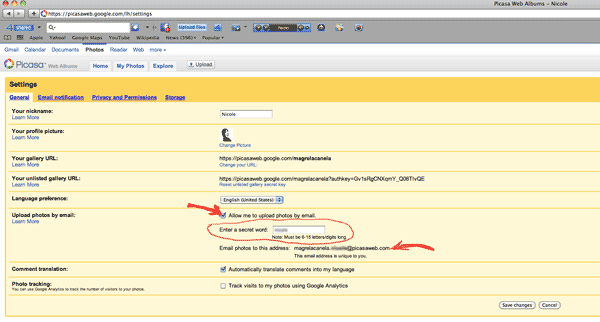
Next click on the little gear on the top right hand corner of your Picasa Web Albums page,  Look for "Photos settings."


You are going to look for the option to upload your photos by email. You will have to type in a secret word. This will give you a unique email address that is hidden within your gmail/Picasa Web Album account. Every time you want to back up your photo from your phone to the cloud, simply email it to this special email address.  For your trusted family, friends, or classmates, you can also give them the secret email, and you can collaboratively contribute to a photo album.


After you have done this, your photo(s) will land directly in your drop box in Picasa.  You can move, organize, or edit these later from your computer, or change your privacy settings.  But for now, they are safe in the cloud.
Enjoy!

Thursday, June 2, 2011

Cinemagraphs: Photos Brought to Life in Animated .gifs

From animated .gifs
I just learned how to make a cinemagraph, and here's my first quick sample.  It's pretty cool, and even a little creepy.  Something between photo and video, it's a picture that surprises you when it moves.
For much more beautiful samples that have inspired me to keep working at it, here are some links to explore.  I couldn't do a better job myself, but Russell Brown from Adobe shows you how to do it in this video tutorial using Photoshop CS5 Extended.  Here's another step by step written tutorial here.  
From animated .gifs

Friday, May 27, 2011

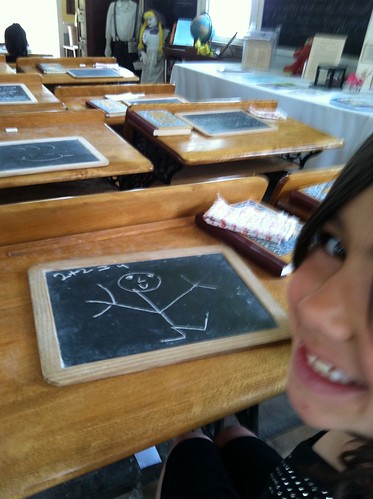
"I don't teach old school" with Flickit.

Testing the Flickit app. I like it!  This is a great way to post directly to the cloud from your phone.

Wednesday, May 25, 2011

Air Camera / Drop Box- My review on a couple of free Smart Phone Apps. for file transfers from phone to cloud to computer

So nowadays we are taking more and more pictures with our phones instead of our digital cameras. And even if you are not a photographer, you are still probably like me, and are looking for easy ways to share and transfer your smart phone photos to a good online storage space. Air Camera seems a promising solution, as it allows you to take photos on your phone, apply a cool filter (with lots to choose from, if you like) and then upload to their site where you can safely store your photos in the cloud. Although it can be a little tricky the first time to figure out where your photo went, and it may take a minute, it definitely works. You can then easily access these photos on your account on your smart phone or from any computer with internet. From there, you can easily share with sites like Twitter, Facebook, or get a link to share or embed on your blog or website.
If you prefer, you can also later download those photos that you took on your phone to your computer without having to plug in to the computer and sync it up. It's pretty cool.  So besides convenience, why else would someone want to do this?

Well, besides the fact that this is a great (free) way to back up your pics. when you are on the go, why would you want to do it?

Simply put, for those photographers, digital artists, teachers, or parents (like me), you can really get creative with it!  And I love anything that sparks creativity.  How about for those photo of the day projects?  Or for those time-lapse projects that take a really long period of time? (like photographing your child's face once a day.  (See also the Everyday app., another one I love) How about the tree in front of your house?  How about as a way to document student progress?  You could take a photo of their drawings or writing as they learn and develop.  For anyone interested in science, here's a great way to document your experiments.  There are lots of possibilities.  (For more info. on ideas on time lapse, see this video tutorial I made.)

Air Camera allows you to make separate folders for each of your projects that are safely stored, and easily organized.  


Still don't like this free app.? And yes, it's still not perfect, so my favorite alternative is the Dropbox app., although the storage is more limited. No filters in Dropbox, but with that app. you can also transfer videos or audio files from your phone to Dropbox in the cloud, and then back to your computer without syncing. It is also a great way to share files with others as well.

If you know of any other better ways to tranfer media from phone to cloud to computer, please share.

Monday, May 2, 2011

Photosynth - an incredible panoramic photography app. for your iPhone or PC

Just discovered a truly amazing app. for my iPhone, quite possibly the best FREE app. I have ever found. Then I also realized you can make them on your PC. I love it! This app. makes interactive panorama / 3D photos. It allows you to view a thing or a scene from all angles. See sample below. Also, make sure to see the Photosynth website and download the iPhone app. I love it!